Tuesday, November 29, 2011

Book Markers Part Three - The End

Measure out the thread to where you want the other side of the beads to start perhaps 12inches
from inside knot to inside knot
Add your next set of beads
Put a knot in the end 
Cut off extra thread - close to the knot - on BOTH ENDS
Put a dab of glue on each knot at the ends to seal and secure the knots
and you are done - and have a beautiful
handmade Book Marker

Enjoy

Book Marker Part Two

After you have cut the WAXED Linen thread to the desired length
put a dab on glue on the threading end to make it easier to go through the beads
Tie a knot on one end and start threading your beads on
Perhaps you have chosen your beads and laid them out in the order you want them
or then again maybe not and you just want to 'see what happens'
When you are happy with one end, tie an knot on the other end as close to the finished bead
as possible - this becomes one end of your book mark

Book Markers Part One

Book Markers 2011
Made from Beads and Wood and Creativity
What you will need
Beads your choice
WAXED Linen Thread
Glue
Scissors
Ruler
Book
Something to hold your beads in place
Make sure the beads you buy or have on hand
have HOLES big enough for the WAXED Linen String to go through
Measure out your thread at least 20 inches long  (at least)
now the fun begins  let's go to PART TWO

Sunday, November 27, 2011

Harry Loves Grouse 2011

Harry Loves Grouse 2011
Christmas Ornament
Gotta thank a friend for sending me grouse feathers
without them this ornament would not have been possible.
Harry loves grouse and his mom and dad
are gonna have to keep him away from
the tree... these feathers smell good.
How do I know, because even my
non-hunting dog was trying
to get the feathers
up his nose.
Merry Christmas Harry
Enjoy

The Huntress Ornament
The dog this ornament goes to is also a show dog as well as
a wonderful hunting dog
This fits her and her two loves

The Princess Ornament

The Princess Ornament
Remember last Friday I went shopping after Thanksgiving to craft stores

well I bought a mold making kit
and I made the crown... I wanted a crown for the ornament
and I had one, but I use it... so I made a copy
then I painted it gold
and put together this ornament...it is a commissioned piece
took quite a while to make it all come together
but
I think it turned out rather well
The Five Grandkids and a dark haired Cousin
I love being a grandma
it has been such a pleasure to watch these kids
all grow up
Lets see we have a dancer, a gymnast, a girly girl,
an artist of theatre and song, a football dude, and a
piano man
and I am sure that all that will change, grow
and adapt as they all grow older
but for now they are very busy just being kids
Love you all, Grandma

Saturday, November 26, 2011

Post Thanksgiving 2011

Aim'in High Camouflage

Thanksgiving is over - the day was wonderful
Family - friends - and of course lots of wonderful food
The weather was perfect!

I did go shopping on Black Friday - I bought some craft stuff
cause I had 50% off coupons
I also went to apply for a job - most of the agencies were closed
or closing early or apply on line only
Ok  so Monday we start over looking for work

I have been making bookmarkers for Christmas presents
and I am reading two books

One called  HORSE SOLDIERS about the war in Afganistan in 2001
and the other is
A LOG CABIN CHRISTMAS
a collection of pioneer Christmas stories

I shall made a HOW TO of the
Book Markers I have made later

Jello Fudge was a Big Hit

Brian has a fire going in the furnace tonight
to we are toasty warm

Not many more days til December
my this year has gone fast

Wednesday, November 23, 2011

Happy Thanksgiving 2011

Because of what the Lord has done for us
We give Thanks
unto the Holy One
The older I get, it seems the less I know, the world is changing so fast
but the one thing that remains constant is the knowledge
that I am loved by God and he sent Jesus to die for my sins
and I accepted his gift of salvation and when I die
I will be on my way to heaven
SHOUTING VICTORY
and that has nothing to do with learning how to program
a vrc, learning a new computer program, buying a big TV,
whether I have money in the bank or an Island Estate...
I am truly Thankful for what the Lord has done in my life,
and what he continues to do day in and day out.
I enjoy the peace that passes all understanding,
I know my SAVIOR LIVES and is alive forever more
and HE is always available 24/7 to hear me when I pray
and to uphold me in his care.
Yep, pretty good deal being a Child of the Most High God
and for that I am eternally grateful.
And for those that care to listen,
I am still alive to share His Wonderful Plan of Salvation.
Happy Thanksgiving
from our family to yours


Tuesday, November 22, 2011

Jello Fudge - the Finale

After being in the fridge for two hours -your fudge is ready to eat
Cut into small pieces and put on a serving plate or wrap in waxed paper to give away as treats
REMEMBER this Fudge is VERY RICH
taste it you will see you don't need much for a
satisfying Chocolate morsel
this Fudge can be stored in the fridge or the freezer
Enjoy!

Jello Fudge - Part Three

Microwave 1/3 Cup Chips and 2 Tablespoons of Butter
Stir and then pour over the top of your chocolate fudge base
The Fudge base, pressed into the form ready to be topped with the
Melted Chips and Butter mixture
After the mixture is poured on -  smooth it out to the edges of the form to
cover chocolate base completely
we are almost done
Place this into the Refrigerator for TWO HOURS
and
MAKE SURE UP PICK THIS UP
FROM THE BOTTOM

Jello Fudge - Part Two

Jello Fudge - Part Two
The Recipe
Microwave 3/4 cup of Chips
6 tablespoons of Butter
and 1/3 Cup of Water in a large bowl
Place in microwave for 2 minutes of High or until the butter is melted
Stir
Add DRY pudding mix - stir until well blended
then add the Powdered Sugar into the mix
1 Cup at a time - 3 Cups total
Microwave - melted - not stirred yet
Stirred and now adding the Jello Pudding Mix
Add Powdered Sugar  - 1 Cup at at time,  - Three Cups total
it is OK to use your hands to combine all the ingredients
it is kinda fun actually, then form into a ball and place in the form 
Place the mixture into the WAXED PAPER lined form and press out flat and into
the corners of the form

Jello Fudge - Part One

If you like really rich fudge where just a little is just enough then this recipe is for you!
Jello Fudge
What you will need:
Chocolate Chips  1 bag  this will be divided in half - Chocolate Flavor of your choice
1 small package of Jello - Chocolate flavor of your choice 4 oz size
1 Full Stick of Butter = 8 tablespoons
3 Cups of Powdered Sugar
1/3 Cup of water
-----
A big bowl, measuring cups, wax paper, form or pan
I had a 7 inch x 7 inch form made, I put a hard surface under it that is removeable
so when the fudge is firm I just lift off the form and I can easily cut the fudge into bite size pieces.
Divide the chips approximately in half
Divide one of the halves into 3/4 cup and 1/3 cups
the 3/4 cups makes the fudge  the  1/3 cup makes the topping
Save the other chips for another batch another day
This is my 7 inch x 7 inch form and a cutting board I use for the bottom
I then place the wood form on top of the cutting board and then line the form
with waxed paper

go to Part Two

Monday, November 21, 2011

November 21 Frost

One nice thing about winter time the landscape changes quite dramatically from day to  day and sometimes hour to hour
There is just something wonderful about the handiwork of God
and the delicate frost that covers the trees like silken lace
It was a light frost this morning, but still rather beautiful

Sunday, November 20, 2011

Paper Mache Bowl - Part Two

AFTER you have layered 2 design layers facing inside the bowl NOW add 2 layers of paper FACING TOWARDS You - remember once again to pay attention to the bottom and rim of the bowl for strength - this bowl is done being covered with the papers I have chosen - now it is drying time
Drying TIME is about 24 hours  after 3 hours when the outside seems dry and stable remove the bowl form and the plastic wrap and continue to air dry your paper mache bowl
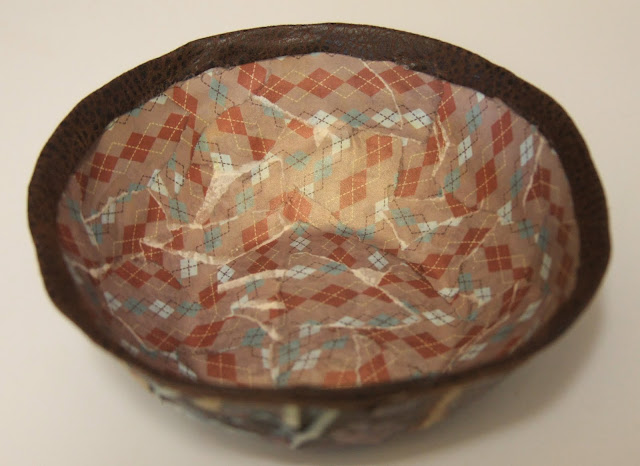
When the bowl is totally dry - hot glue your trim to the rim of the bowl
Close Up of the finished bowl - for this project I used Scrapbook Papers - 
You can make bowls in all different sizes, use all kinds of papers to match your decor
they can hold all kinds of trinkets and decorative pieces, gifts, wrapped candies - these are easy for kids to make - messy but fun and perfection is not needed
Paper Mache Bowls  - fun to make - skill level SUPER EASY - Low Cost
Easter Gift Baskets, Baby Shower Bowl, Bridal Shower
let your imagination flow
Enjoy!

Paper Mache Bowl Part One

Things you will need: A bowl for the form, White Glue, Container to hold water/glue mixture, Pastic Wrap, Paper products to tear, edge trimmings, water, and a protective table covering
Mix equal parts  water and glue and put in container for dipping torn pieces of paper in
Dip torn paper into glue/water mixture and remove excess glue before placing on plastic film covered bowl - form
Place torn paper so the side you want VISIBLE is facing the INSIDE of the bowl
The Pattern Side goes towards the inside of the bowl - make 2 LAYERS of the paper and make sure you cover the whole bowl form twice - pay special attention the the rim of the bowl and the bottom to make sure the paper mache will be strongest in both these areas  - go to part two -

Homemade Dog Treats

Simple Pup Recipes Cookbook
a dog treat cookbook
SIMPLE, QUICK, EASY, and
YUMMY
I am the author and photographer and publisher of this little book

I wanted to make a book that I could find all kinds of different dog treats that were located in one place... rather than do the internet search and print out the recipes every time I wanted to make some treats for my dog. I wanted them to be quick, simple, easy and ingredients I could find at my local grocery store.

That is how this book came to be, I can locate the book quickly, I can take it to the store with me and I can mark in the book the ones I like the best.

Inside this book is information on puppy formula for fading puppies, a recipe for putting weight on your dog, diabetic, hypo-allergic dogs, dogs who will eat just about anything. Included in the book are Pupsicles to Liver Snaps.

In the photo above I have Easy Cheesy, Liver Snaps, and Meat Treats.

I have made all the recipes in the book, my dogs have tasted tested all the recipes and they have been approved by all.

Testimonies for folks who have bought the book are thrilled with the ease and simplicity of the making of the treats
and LOVE the fact they can just go to the grocery store and get all needed items.


I sell these books for $5.00 each that INCLUDES FREE SHIPPING
in the USA, outside order I must charge $2 for mailing


Christmas is coming - but these books are good to use year around.
However, if you want to make some treats as gifts for your doggy friends and give a book to their owners.. it will truly be a gift that will be used year around.

Grooming shops, vet clinics, shelters, rescues, breeders, dog show trophies, volunteer appreciation gift, dog walker, trainers, etc the list is endless for the dog lovers on your list...

Drop me a comment and I will get back to you... if you would like a book

Enjoy your day :)


Saturday, November 19, 2011

Where did my driveway go?

Where did my driveway go?
It was there 4 hours ago

Pumpkin Butter Impossible Pumpkin Pie
I had some leftover Pumpkin Butter since I ran out of canning jar lids
so I thought I would make a pie with the remaining product
Hello!  Bisquick Impossible No Crust Pumpkin Pie Recipe
and this is the end result.
This Pie is Outrageously Great!

I am not a fan of crust and I can't make it either
so this is my favorite kind of pie
Oh my this is good, this is so good..so
If you make some Pumpkin Butter
hold some back and make yourself
a wonderful pie.